[Spring Security] 인증 아키텍처

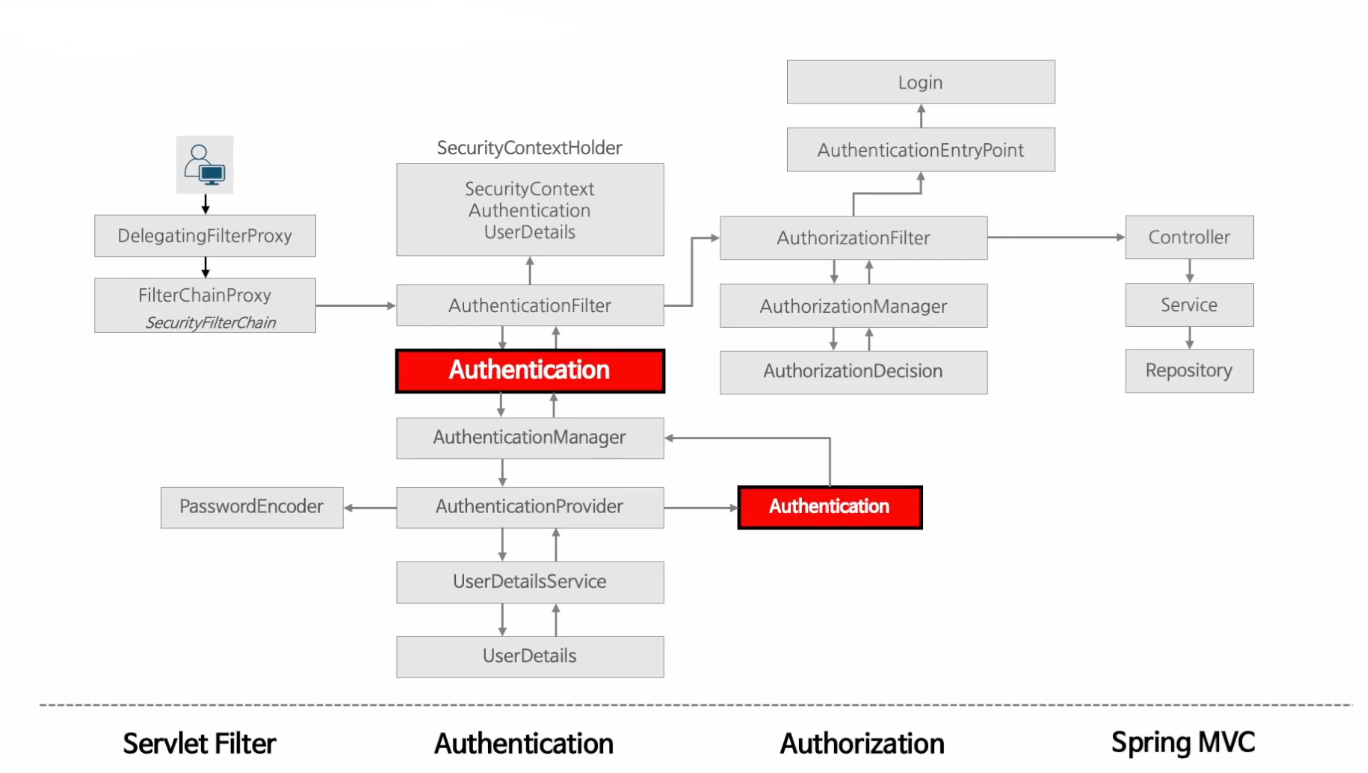
사용자가 요청하면 서블릿 필터인 DelegatingFilterProxy가 요청을 받아 스프링 필터 쪽으로 요청을 넘긴다.
AuthenticationFilter는 Authentication 객체를 만들어 AuthenticationManager에게 넘겨준다.
Manager는Provider에게 인증을 위임해 사용자의 ID / PASSWORD를 검증시키는데, 이 때 UserDetailsService 객체로 사용자 정보를 가져온다.
인증에 성공했다면 UserDetailService는UserDeatils 타입의 객체를 만들고, 이 객체는 다시 Provider로 올라간 후 Authentication 객체를 만든다.
만들어진 Authentication 객체는 SecurityContextHolder를 통해 SecurityContext 안에 저장한다.
SecurityContext 안에는 Authentication 객체가 있고, Authentication 객체 안에는 UserDetails 객체가 있다.
Authentication 객체는 인증 처리 전 / 후 두 번 생성함에 주의하자.
public interface Authentication extends Principal, Serializable {

	Collection<? extends GrantedAuthority> getAuthorities();
	Object getCredentials();
	Object getDetails();
	Object getPrincipal();
	boolean isAuthenticated();
	void setAuthenticated(boolean isAuthenticated) throws IllegalArgumentException;

}
SpringSecurity 소스코드를 까 보면 설명도 잘 나와있지만.. 그래도 정리해보자면
Authentication 객체는 자바가 제공하는 Principal 객체를 상속받는다.
getPrincipal() : 인증 주체를 의미하며, 인증 요청 시에는 사용자 ID / 인증 이후에는 UserDetails 타입의 객체이다.
getCredentials() : 비밀번호라고 생각하면 된다 .
getAuthorities() : 사용자에게 부여된 권한을 나타낸다.
getDetails() : 인증 요청에 대한 추가 사항을 저장한다. (IP주소 등..)
SecurityContext는 인증된 사용자의 Authentication 객체를 저장하고, SecurityContext 자체는 SecurityContextHolder를 통해 접근할 수 있는 ThreadLocal 저장소에 저장돼 쓰레드가 각각의 보안 상태를 유지한다. (저장 전략은 변경할 수 있다)
쓰레드마다 독립적으로 SecurityContext를 가지고 있고, 애플리케이션의 어떤 곳에서도 참조할 수 있다.
쓰레드 풀으로 쓰레드를 관리하는 경우 ThreadLocal이 재사용 될 수 있어 클라이언트로 응답하기 직전에 항상 ThreadLocal 내부의 SecurityContext를 삭제한다.

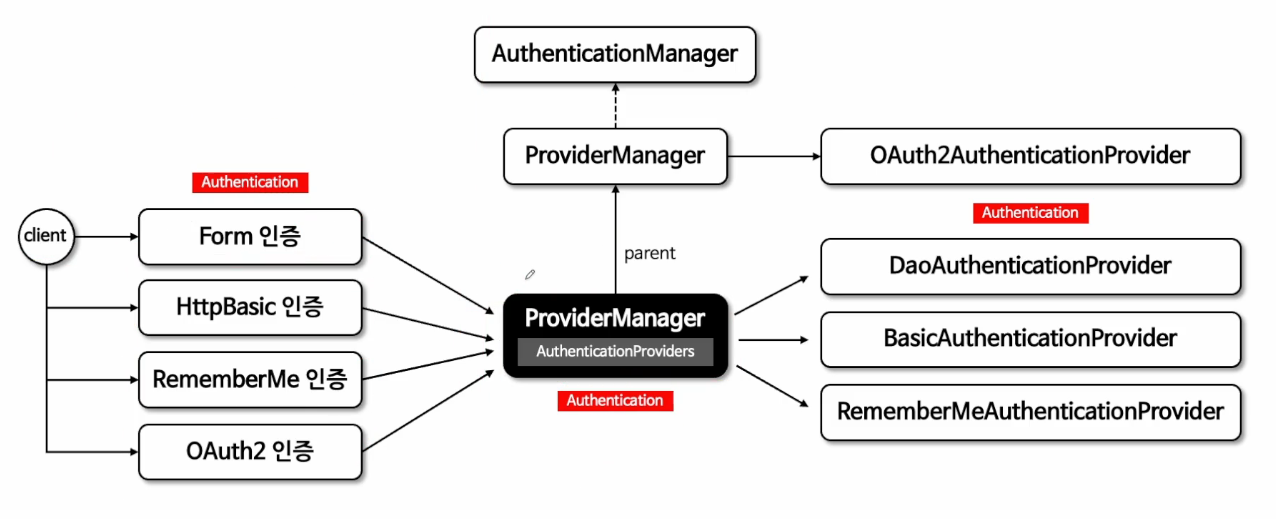
AuthenticationManager는 여러 Provider를 관리해 AuthenticationProvider 목록을 순회하며 인증 요청을 처리한다
클라이언트가 요청은 인증 방식에 적합한 Provider를 선택해 인증을 수행한다.
즉, 사용자가 요청할 때 Authentication 객체를 하나 만들고 적절한 Provider가 해당 Authentication 객체로 인증 처리를 수행한 후 Authentication 인증 객체를 다시 생성한다.
적절한 Provider가 없는 경우 자신의 부모가 인증을 처리할 수 있는 Provider를 가지고 있는지 확인해 추가적으로 탐색하지만.. Provider를 찾지 못하는 경우 ProviderNotFoundException 을 뱉는다.
// HttpSecurityConfiguration
@Bean(HTTPSECURITY_BEAN_NAME)
@Scope("prototype")
HttpSecurity httpSecurity() throws Exception {
    LazyPasswordEncoder passwordEncoder = new LazyPasswordEncoder(this.context);
    AuthenticationManagerBuilder authenticationBuilder = new DefaultPasswordEncoderAuthenticationManagerBuilder(
            this.objectPostProcessor, passwordEncoder);
    authenticationBuilder.parentAuthenticationManager(authenticationManager());
    ..
}

private AuthenticationManager authenticationManager() throws Exception {
    return this.authenticationConfiguration.getAuthenticationManager();
}


// AuthenticationConfiguration
public AuthenticationManager getAuthenticationManager() throws Exception {
    if (this.authenticationManagerInitialized) {
        return this.authenticationManager;
    }
    AuthenticationManagerBuilder authBuilder = this.applicationContext.getBean(AuthenticationManagerBuilder.class);
    if (this.buildingAuthenticationManager.getAndSet(true)) {
        return new AuthenticationManagerDelegator(authBuilder);
    }
    for (GlobalAuthenticationConfigurerAdapter config : this.globalAuthConfigurers) {
        authBuilder.apply(config);
    }
    this.authenticationManager = authBuilder.build();
    if (this.authenticationManager == null) {
        this.authenticationManager = getAuthenticationManagerBean();
    }
    this.authenticationManagerInitialized = true;
    return this.authenticationManager;
}

// AuthenticationManagerBuilder
@Override
public AuthenticationManagerBuilder authenticationProvider(AuthenticationProvider authenticationProvider) {
    this.authenticationProviders.add(authenticationProvider);
    return this;
}

@Override
protected ProviderManager performBuild() throws Exception {
    if (!isConfigured()) {
        this.logger.debug("No authenticationProviders and no parentAuthenticationManager defined. Returning null.");
        return null;
    }
    ProviderManager providerManager = new ProviderManager(this.authenticationProviders,
            this.parentAuthenticationManager);
    if (this.eraseCredentials != null) {
        providerManager.setEraseCredentialsAfterAuthentication(this.eraseCredentials);
    }
    if (this.eventPublisher != null) {
        providerManager.setAuthenticationEventPublisher(this.eventPublisher);
    }
    providerManager = postProcess(providerManager);
    return providerManager;
}
AuthenticationManager를 얻어온다.
먼저 빈으로 생성된 Builder 객체를 찾아오고, build 메서드로 AuthenticationManager를 생성한다.
build 메서드 내부에서는 Provider 하나를 생성해, AuthenticationManager는 Provider를 가진다.
@Bean
public SecurityFilterChain securityFilterChain(HttpSecurity http) throws Exception {

    AuthenticationManagerBuilder builder = http.getSharedObject(AuthenticationManagerBuilder.class);
    AuthenticationManager authenticationManager = builder.build();


    http
        .authorizeHttpRequests(auth -> auth.anyRequest().authenticated())
        .formLogin(Customizer.withDefaults())
        .authenticationManager(authenticationManager)
        .addFilterBefore(customAuthenticationFilter(http, authenticationManager), UsernamePasswordAuthenticationFilter.class);


        return http.build();
}

public CustomAuthenticationFilter customAuthenticationFilter(HttpSecurity http, AuthenticationManager authenticationManager) {
    CustomAuthenticationFilter customAuthenticationFilter = new CustomAuthenticationFilter();
    customAuthenticationFilter.setAuthenticationManager(authenticationManager);
    return customAuthenticationFilter;

}
이후 생성된 Builder를 애플리케이션에서 가져와 사용할 수 있다.
build 메서드는 한 번만 호출하고, 이후에는 getObject 메서드로 객체를 가져온다.
사용자 정의 인증 필터를 만들 때 이 방식을 사용한다. (JWT, OAuth 등..)

UserDetailsService는 사용자의 정보를 로드하는 인터페이스이다.
AuthenticationProvider가 UserDetailsService를 사용해 UserDetails 객체를 조회한다.
UserDetailsService를 반환하는 메서드가 하나인 경우, 그 메서드를 빈으로 등록 시 초기화 과정에서 해당 메서드를 사용하도록 설정되고, 일반 객체를 사용하는 경우 SecurityConfig에서 managerBuilder로 메서드를 등록해 줘야 한다.
public interface UserDetailsService {
	UserDetails loadUserByUsername(String username) throws UsernameNotFoundException;
}

@Component
public class CustomAuthenticationProvider implements AuthenticationProvider{

    private final UserDetailsService userDetailsService;

    public CustomAuthenticationProvider(UserDetailsService userDetailsService) {
        this.userDetailsService = userDetailsService;
    }


    @Override
    public Authentication authenticate(Authentication authentication) throws AuthenticationException {

        String loginId = authentication.getName();
        String password = (String) authentication.getCredentials();

        UserDetails user = userDetailsService.loadUserByUsername(loginId);

        if(user == null) throw new UsernameNotFoundException("...");

        return new UsernamePasswordAuthenticationToken(
            user.getUsername(), user.getPassword(), user.getAuthorities()
        );
    }

    @Override
    public boolean supports(Class<?> authentication) {
        return authentication.isAssignableFrom(UsernamePasswordAuthenticationToken.class);
    }

}
보통 CustomAuthenticationProvider와 CustomUserDetailsService를 정의해 엮어서 사용한다.
public interface UserDetails extends Serializable {
	Collection<? extends GrantedAuthority> getAuthorities();
	String getPassword();
	String getUsername();
	boolean isAccountNonExpired();
	boolean isAccountNonLocked();
	boolean isCredentialsNonExpired();
	boolean isEnabled();
}
UserDetails 인터페이스는 스프링 시큐리티에서 인증을 처리할 때 사용하는 객체이다.
비밀번호의 유효기간 / 계정의 유효기간 / 계정 잠김 여부 등을 제어할 수 있고, 사용자 ID, 비밀번호, 권한을 관리한다.
'Spring > Spring Security' 카테고리의 다른 글
| [Spring Security] 예외 처리 (0) | 2024.06.12 |
|---|---|
| [Spring Security] 인증 상태 영속성 (0) | 2024.06.10 |
| [Spring Security] 인증 메커니즘 (0) | 2024.05.30 |
| [Spring Security] 초기화 과정 (0) | 2024.05.27 |
| [Spring Security6] 인증 서버 구축 (0) | 2023.08.15 |
댓글
이 글 공유하기
다른 글
-
[Spring Security] 예외 처리
[Spring Security] 예외 처리
2024.06.12 -
[Spring Security] 인증 상태 영속성
[Spring Security] 인증 상태 영속성
2024.06.10 -
[Spring Security] 인증 메커니즘
[Spring Security] 인증 메커니즘
2024.05.30 -
[Spring Security] 초기화 과정
[Spring Security] 초기화 과정
2024.05.27