[Android] 인텐트와 프로그레스바 사용하기
반응형
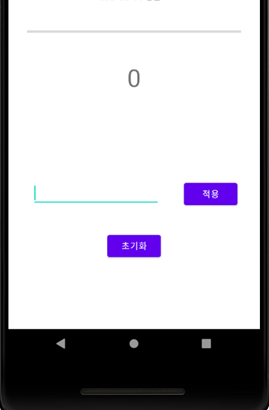
프로그레스 바를 사용해 보고 인텐트를 통해 화면 전환 동작을 수행하는 앱을 만들어 보자.
소스코드
더보기
// MainActivity
package kprogressbar;

import android.content.Intent;
import android.view.View;
import android.widget.Button;
import android.widget.EditText;
import android.widget.ProgressBar;
import android.widget.TextView;
import androidx.appcompat.app.AppCompatActivity;
import android.os.Bundle;
import org.w3c.dom.Text;

public class MainActivity extends AppCompatActivity {

    @Override
    protected void onCreate(Bundle savedInstanceState) {
        super.onCreate(savedInstanceState);
        setContentView(R.layout.activity_main);

        EditText setnumber = (EditText) findViewById(R.id.setnumber);
        ProgressBar progress = (ProgressBar) findViewById(R.id.progress);

        Button apply =  (Button) findViewById(R.id.apply);
        apply.setOnClickListener(new View.OnClickListener(){
            public void onClick(View v){
                if(Integer.parseInt(setnumber.getText().toString())>=0&&Integer.parseInt(setnumber.getText().toString())<=100){
                    TextView show = (TextView) findViewById(R.id.show);
                    show.setText(setnumber.getText().toString());
                    progress.setProgress(Integer.parseInt(setnumber.getText().toString()));
                } else{
                    Intent wrongmessage = new Intent(getApplicationContext(), wrongmessage.class);
                    startActivity(wrongmessage);
                }
            }
        });

        Button reset = (Button) findViewById(R.id.reset);
        reset.setOnClickListener(new View.OnClickListener(){
            public void onClick(View v){
                TextView show = (TextView) findViewById(R.id.show);
                show.setText("0");
                progress.setProgress(0);
            }
        });


    }
}

// MainActivity XML

<?xml version="1.0" encoding="utf-8"?>
<androidx.constraintlayout.widget.ConstraintLayout
        xmlns:android="http://schemas.android.com/apk/res/android"
        xmlns:tools="http://schemas.android.com/tools"
        xmlns:app="http://schemas.android.com/apk/res-auto"
        android:layout_width="match_parent"
        android:layout_height="match_parent"
        tools:context=".MainActivity">
    <TextView
            android:layout_width="wrap_content"
            android:layout_height="wrap_content"
            app:layout_constraintEnd_toEndOf="parent" app:layout_constraintStart_toStartOf="parent"
            app:layout_constraintTop_toTopOf="parent" android:layout_marginTop="50dp" android:id="@+id/idname"
            android:layout_marginLeft="40dp" android:layout_marginStart="40dp" android:layout_marginRight="40dp"
            android:layout_marginEnd="40dp"/>
    <TextView
            android:text="0"
            android:layout_width="wrap_content"
            android:layout_height="wrap_content" android:id="@+id/show"
            android:textSize="40sp"
            app:layout_constraintTop_toBottomOf="@+id/progress" app:layout_constraintStart_toStartOf="parent"
            android:layout_marginLeft="40dp" android:layout_marginStart="40dp" android:layout_marginEnd="40dp"
            android:layout_marginRight="40dp" app:layout_constraintEnd_toEndOf="parent"
            android:layout_marginTop="40dp"/>
    <Button
            android:text="적용"
            android:layout_width="wrap_content"
            android:layout_height="wrap_content" android:id="@+id/apply"
            app:layout_constraintEnd_toEndOf="parent" android:layout_marginRight="36dp"
            android:layout_marginEnd="36dp" app:layout_constraintTop_toBottomOf="@+id/show"
            android:layout_marginTop="140dp"/>
    <Button
            android:text="초기화"
            android:layout_width="wrap_content"
            android:layout_height="wrap_content" android:id="@+id/reset"
            app:layout_constraintStart_toStartOf="parent"
            android:layout_marginLeft="40dp" android:layout_marginStart="40dp" android:layout_marginEnd="40dp"
            android:layout_marginRight="40dp" app:layout_constraintEnd_toEndOf="parent"
            app:layout_constraintTop_toBottomOf="@+id/setnumber" android:layout_marginTop="40dp"/>
    <ProgressBar
            style="?android:attr/progressBarStyleHorizontal"
            android:layout_width="350dp"
            android:layout_height="wrap_content"
            android:id="@+id/progress" app:layout_constraintEnd_toEndOf="parent"
            app:layout_constraintStart_toStartOf="parent" app:layout_constraintTop_toBottomOf="@+id/idname"
            android:layout_marginTop="40dp" android:layout_marginLeft="20dp" android:layout_marginStart="20dp"
            android:layout_marginRight="20dp" android:layout_marginEnd="20dp"/>
    <EditText
            android:layout_width="wrap_content"
            android:layout_height="wrap_content"
            android:inputType="numberDecimal"
            android:ems="10"
            android:id="@+id/setnumber"
            app:layout_constraintEnd_toStartOf="@+id/apply" app:layout_constraintStart_toStartOf="parent"
            app:layout_constraintTop_toBottomOf="@+id/show" android:layout_marginTop="140dp"
            android:layout_marginLeft="40dp" android:layout_marginStart="40dp" android:layout_marginRight="40dp"
            android:layout_marginEnd="40dp"/>
</androidx.constraintlayout.widget.ConstraintLayout>

// 오류창 XML
<?xml version="1.0" encoding="utf-8"?>
<androidx.constraintlayout.widget.ConstraintLayout
        xmlns:android="http://schemas.android.com/apk/res/android"
        xmlns:tools="http://schemas.android.com/tools"
        xmlns:app="http://schemas.android.com/apk/res-auto"
        android:layout_width="match_parent"
        android:layout_height="match_parent"
        tools:context=".wrongmessage">
    <TextView
            android:text="잘못된 값을 입력하였습니다. 0~100 사이의 값을 입력하십시오."
            android:layout_width="300dp"
            android:layout_height="100dp" android:id="@+id/textView2"
            app:layout_constraintEnd_toEndOf="parent" app:layout_constraintStart_toStartOf="parent"
            app:layout_constraintTop_toTopOf="parent" app:layout_constraintBottom_toBottomOf="parent"
            android:paddingLeft="20dp" android:paddingTop="20dp" android:paddingRight="20dp"
            android:paddingBottom="20dp"/>
</androidx.constraintlayout.widget.ConstraintLayout>
//오류창 JAVA
package kr.ac.cnu.computer.progressbar;

import androidx.appcompat.app.AppCompatActivity;
import android.os.Bundle;

public class wrongmessage extends AppCompatActivity {

    @Override
    protected void onCreate(Bundle savedInstanceState) {
        super.onCreate(savedInstanceState);
        setContentView(R.layout.activity_wrongmessage);
    }
}

//AndoridManifest XML
<?xml version="1.0" encoding="utf-8"?>
<manifest xmlns:android="http://schemas.android.com/apk/res/android"
          package="kr.ac.cnu.computer.progressbar">

    <application
            android:allowBackup="true"
            android:icon="@mipmap/ic_launcher"
            android:label="@string/app_name"
            android:roundIcon="@mipmap/ic_launcher_round"
            android:supportsRtl="true"
            android:theme="@style/Theme.Progressbar">
        <activity android:name=".wrongmessage"
                  android:exported = "true"
                  android:label = "잘못된 접근"
                  android:theme = "@style/Theme.AppCompat.Dialog"
                    >
        </activity>
        <activity
                android:name=".MainActivity"
                android:exported="true">
            <intent-filter>
                <action android:name="android.intent.action.MAIN"/>

                <category android:name="android.intent.category.LAUNCHER"/>
            </intent-filter>
        </activity>
    </application>

</manifest>
<설명>
진행 상황을 표시하는 프로그레스바를 만들어 봤다.
화면 구성은 Constraint Layout으로 구성했다.
적절하지 않은 값을 입력하게 되면 Intent객체를 생성해 주의를 주는 대화상자를 표시하도록 했다.
각 버튼들에 대해 클릭 처리는 Onclicklistener를 구현해서 처리해 줬다.
적용 버튼을 눌렀을 때를 살펴보자.
EditText가 0~100 사이의 값으로 입력됐으면 입력된 수로 프로그레스바를 설정하고 텍스트뷰의 값도 그 값으로 설정했고, 입력값이 0~100 사이가 아니라면 Intent객체를 생성해 대화상자를 표시하도록 했다.
초기화 버튼에 대해 살펴보자.
초기화 버튼을 누르면 프로그레스 바와 텍스트뷰의 값을 0으로 설정하도록 했다.
대화상자는 Padding을 이용해 적절한 간격을 지정해 줬다.
반응형
'Mobile > Android' 카테고리의 다른 글
| [Android] 쓰레드와 핸들러 (0) | 2021.11.12 |
|---|---|
| [Android] 서비스와 브로드캐스트 수신자 (1) | 2021.11.06 |
| [Android] 여러 화면 간 전환 (0) | 2021.10.25 |
| [Android] 대화상자 사용하기 (0) | 2021.10.18 |
| [Android] 간단한 계산기 만들기 (0) | 2021.10.18 |