[Android] 뷰 / 레이아웃 기초 1

인텔리제이에서 안드로이드 프로그래밍을 처음 시작할 때 볼 수 있는 화면이다.
자바를 공부한 사람들이라면 코드가 그렇게 낯설지는 않을 것이다.
MainActivity 클래스가 AppCompatActivity 클래스를 상속받고, 오버라이드, 수정 등을 통해서 자신만의 앱을 만들 수 있다. 코드를 하나하나 분석해 보면서 공부하면 이해가 더 빠를 것이다.
1. 뷰와 뷰그룹
뷰
화면에 보이는 각각의 것들을 말한다. (버튼 , 텍스트..)
텍스트를 입력하고 그 값을 통해 동작을 하거나, 버튼을 눌렀을 때 동작하게 할 수 있다.
뷰 중에서 화면에 보이면서 컨트롤 역할을 하는 것을 위젯이라고 부른다.
뷰 그룹
뷰들을 여러 개 포함하고 있다.
뷰 그룹도 뷰에서 상속받고 뷰가 된다.

오른쪽 그림을 통해 상속관계를 잘 이해할 수 있다.
모든 클래스의 조상인 Object클래스가 가장 상위 클래스로 존재하고,
뷰 그룹의 조상으로 뷰 클래스가 존재함을 알 수 있다.
위젯
뷰 중에서 컨트롤의 역할을 담당하는 것.
버튼이나 텍스트 등을 말한다.
레이아웃
뷰 그룹 중에서 내부에 뷰들을 포함하고 있으면서, 그것들을 배치하는 역할을 하는 것을 말한다.
상속을 통해 레이아웃도 뷰 그룹을 상속받기 때문에, 레이아웃도 뷰 그룹이라고 할 수 있다.
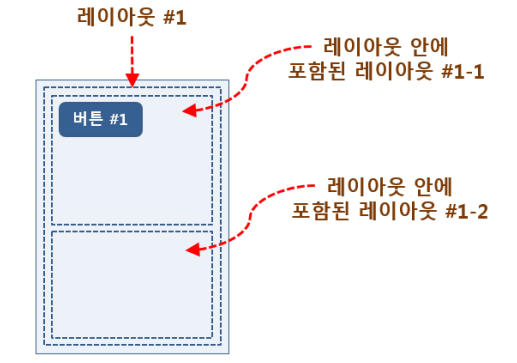
(레이아웃 안에 레이아웃 포함 가능.)
즉, 화면에 있는 모든 것을 뷰 라고 할 수 있고, 뷰는 위젯과 레이아웃으로 구분할 수 있다.
2. XML 레이아웃
액티비티는 XML문서를 통해 컴퓨터에 표현된다.
디자인 도구를 통해 화면을 구성하는 방법도 있지만,
디자인 도구에서 해결할 수 없는 경우도 많다. 앞으로는 XML원본 코드를 수정할 경우가 많아질 것이다.
XML 레이아웃에 대해 알아보자.
XML 레이아웃은 뷰 태그와 속성으로 구성돼있다.

<< XML 레이아웃의 형식
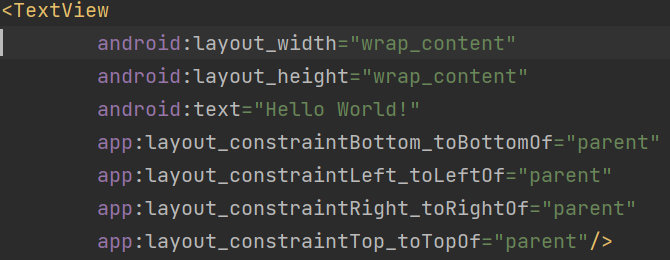
<< XML레이아웃의 예시
텍스트 뷰 라는 객체의 상태를 나타낸다.
XML 코드에서 접두어의 의미

위는 XML 코드의 예시이다.
xmlns : 네임스페이스를 말한다. 패키지 개념을 생각하자.
xmlns:android="http://schemas.android.com/apk/res/android"
안드로이드의 네임스페이스는 "주소" 에서 정의됐다고 생각하면 된다.
연결선이 만들어낸 XML 속성의 형식.

왼쪽 그림과 같이 button2의 윗부분 연결점에서 button1의 아랫부분 연결점으로 연결했을 때, Top_toBottomOf 수식어가 붙는다.
3. 크기 지정 방법
layout_width : 뷰의 폭을 설정한다.
layout_height : 뷰의 높이를 설정한다.
속성을 표현하는 방법으로는 세 가지가 있다.
match_parent
뷰그룹의 여유 공간을 꽉 채운다.
단말기 마다 해상도나 화면의 크기가 다른 경우가 많은데, 전체 화면을 기준으로 뷰를 배치할 수 있어 편하다.
wrap_content
뷰에 들어있는 내용물의 크기에 따라서 뷰의 크기를 결정한다.
단말기 마다 해상도나 화면의 크기가 다른 경우가 많은데, 전체 화면을 기준으로 뷰를 배치할 수 있어 편하다.
크기 값 지정
고정된 값으로 지정할 때 사용한다.
단위는 dp / px 을 사용.

뷰의 크기 지정에 필요한 단위에 대한 설명이다.
뷰에는 dp 글자크기에는 sp단위를 사용하는게 좋다.
dp 단위를 사용함으로써 대부분의 단말에서 비슷한 크기로 보이게 할 수 있고,
sp 단위를 사용함으로써 단말의 글꼴 설정에 맞춰 표시되는 글자 크기가 바뀌게 할 수 있다.
제약 레이아웃
뷰의 연결점들을 연결시켜 제약조건을 만들 수 있다.
연결시킬 수 있는 target : 같은 레이아웃 안의 다른 뷰의 연결점 / 부모 레이아웃의 연결점 / 가이드라인
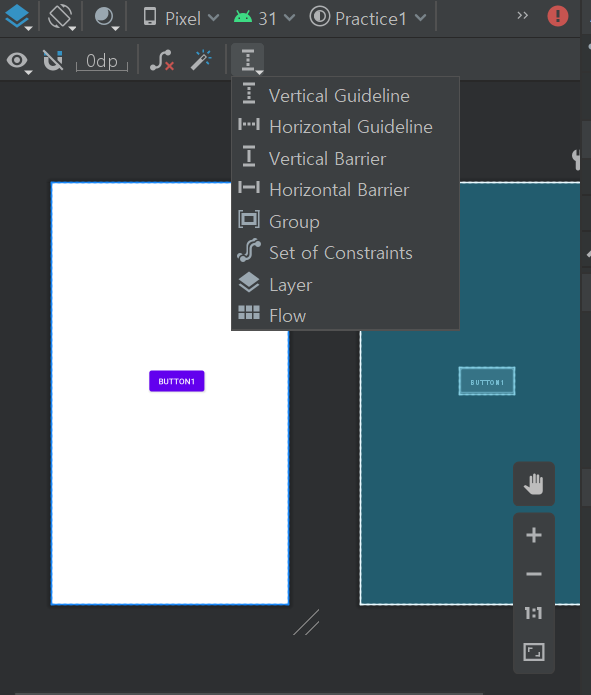
가이드라인은 화면 배치를 위해 추가됐지만, 실제 화면의 구성 요소는 아니다.

가이드라인을 만드는 법은 왼쪽 사진을 참고하자.
▶ 모양 버튼을 눌러 좌측의 가이드라인으로 정할지, 우측의 가이드라인드로 정할지를 결정할 수 있다.
4. 마무리
실습을 통해 정리하자.
1.
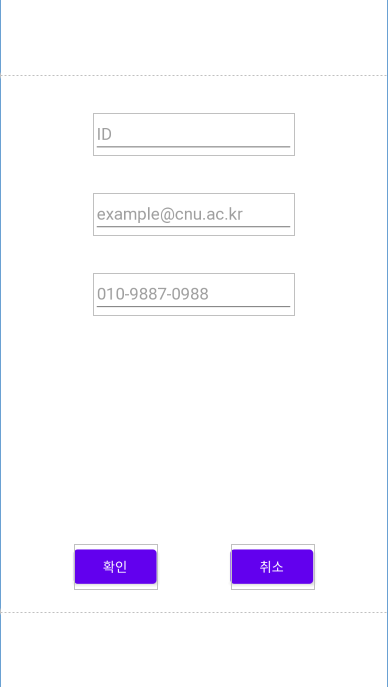
왼쪽 화면을 직접 만들어 보자.
소스코드
<?xml version="1.0" encoding="utf-8"?>
<androidx.constraintlayout.widget.ConstraintLayout
xmlns:android="http://schemas.android.com/apk/res/android"
xmlns:tools="http://schemas.android.com/tools"
xmlns:app="http://schemas.android.com/apk/res-auto"
android:layout_width="match_parent"
android:layout_height="match_parent"
tools:context=".MainActivity">
<androidx.constraintlayout.widget.Guideline android:layout_width="wrap_content" android:layout_height="wrap_content"
android:id="@+id/guideline2" app:layout_constraintGuide_begin="-12dp"
android:orientation="horizontal"/>
<EditText
android:layout_width="wrap_content"
android:layout_height="wrap_content"
android:inputType="textPersonName"
android:ems="10"
android:id="@+id/editTextTextPersonName"
app:layout_constraintStart_toStartOf="parent"
app:layout_constraintEnd_toEndOf="parent"
android:hint="ID" app:layout_constraintTop_toTopOf="@+id/guideline7" android:layout_marginTop="40dp"/>
<EditText
android:layout_width="wrap_content"
android:layout_height="wrap_content"
android:inputType="textEmailAddress"
android:ems="10"
android:id="@+id/editTextTextEmailAddress"
app:layout_constraintTop_toBottomOf="@+id/editTextTextPersonName"
app:layout_constraintStart_toStartOf="parent" app:layout_constraintEnd_toEndOf="parent"
android:layout_marginTop="40dp" android:hint="example@cnu.ac.kr"/>
<EditText
android:layout_width="wrap_content"
android:layout_height="wrap_content"
android:inputType="phone"
android:ems="10"
android:id="@+id/editTextPhone"
app:layout_constraintTop_toBottomOf="@+id/editTextTextEmailAddress"
app:layout_constraintStart_toStartOf="parent" app:layout_constraintEnd_toEndOf="parent"
android:layout_marginTop="40dp" android:hint="010-1234-5678"/>
<androidx.constraintlayout.widget.Guideline android:layout_width="wrap_content" android:layout_height="wrap_content"
android:id="@+id/guideline4" app:layout_constraintGuide_begin="-19dp"
android:orientation="horizontal"/>
<androidx.constraintlayout.widget.Guideline android:layout_width="wrap_content" android:layout_height="wrap_content"
android:id="@+id/guideline5" app:layout_constraintGuide_begin="-101dp"
android:orientation="horizontal"/>
<androidx.constraintlayout.widget.Guideline android:layout_width="wrap_content" android:layout_height="wrap_content"
android:id="@+id/guideline7"
android:orientation="horizontal"
app:layout_constraintGuide_begin="80dp"/>
<Button
android:text="Button"
android:layout_width="wrap_content"
android:layout_height="wrap_content" android:id="@+id/button2"
app:layout_constraintStart_toStartOf="parent" app:layout_constraintHorizontal_bias="0.5"
app:layout_constraintEnd_toStartOf="@+id/button3" app:layout_constraintBottom_toTopOf="@+id/guideline11"
android:layout_marginBottom="40dp"/>
<Button
android:text="Button"
android:layout_width="wrap_content"
android:layout_height="wrap_content" android:id="@+id/button3"
app:layout_constraintStart_toEndOf="@+id/button2"
app:layout_constraintHorizontal_bias="0.5" app:layout_constraintEnd_toEndOf="parent"
app:layout_constraintBottom_toTopOf="@+id/guideline11" android:layout_marginBottom="40dp"/>
<androidx.constraintlayout.widget.Guideline android:layout_width="wrap_content" android:layout_height="wrap_content"
android:id="@+id/guideline11"
android:orientation="horizontal"
app:layout_constraintGuide_end="80dp"/>
</androidx.constraintlayout.widget.ConstraintLayout>
2.

왼쪽 화면을 직접 만들어 보자.
소스코드
<?xml version="1.0" encoding="utf-8"?>
<androidx.constraintlayout.widget.ConstraintLayout
xmlns:android="http://schemas.android.com/apk/res/android"
xmlns:tools="http://schemas.android.com/tools"
xmlns:app="http://schemas.android.com/apk/res-auto"
android:layout_width="match_parent"
android:layout_height="match_parent"
tools:context=".MainActivity">
<Button
android:text="Button2"
android:layout_width="match_parent"
android:id="@+id/button2"
app:layout_constraintTop_toBottomOf="@+id/button" app:layout_constraintStart_toStartOf="parent"
app:layout_constraintEnd_toEndOf="parent" app:layout_constraintBottom_toTopOf="@+id/button3"
android:layout_marginTop="8dp" android:layout_marginLeft="8dp" android:layout_marginStart="8dp"
android:layout_marginBottom="8dp" android:layout_marginRight="8dp" android:layout_marginEnd="8dp"
app:layout_constraintHorizontal_bias="0.0" app:layout_constraintVertical_bias="0.533"
/>
<Button
android:text="Button1"
android:layout_width="match_parent"
android:layout_height="wrap_content" android:id="@+id/button"
app:layout_constraintTop_toTopOf="parent" app:layout_constraintStart_toStartOf="parent"
app:layout_constraintEnd_toEndOf="parent" android:layout_marginTop="8dp" android:layout_marginLeft="8dp"
android:layout_marginStart="8dp" android:layout_marginRight="8dp" android:layout_marginEnd="8dp"/>
<Button
android:text="Button3"
android:layout_width="match_parent"
android:layout_height="wrap_content" android:id="@+id/button3"
app:layout_constraintEnd_toEndOf="parent" app:layout_constraintStart_toStartOf="parent"
app:layout_constraintBottom_toBottomOf="parent" android:layout_marginLeft="8dp"
android:layout_marginStart="8dp" android:layout_marginBottom="8dp" android:layout_marginRight="8dp"
android:layout_marginEnd="8dp"/>
</androidx.constraintlayout.widget.ConstraintLayout>
'Mobile > Android' 카테고리의 다른 글
| [Android] Java 코드와 XML 레이아웃 (0) | 2021.10.11 |
|---|---|
| [Android] 레이아웃 다루기 (0) | 2021.10.11 |
| [Android] 정렬과 배치 (0) | 2021.10.03 |
| [Android] 뷰 / 레이아웃 기초 2 (0) | 2021.10.03 |
| [Android] 안드로이드 소개 (0) | 2021.09.28 |